


The world’s first sport modular helmet! Built for the street — this principle has been Icon’s motto from day one. The Threshold motorcycle helmet is designed for riders who want maximum versatility without any compromise. The helmet combines a streamlined aerodynamic shell with a securely locking flip-up chin bar (modular design) that lets you quickly open the helmet to talk, refuel or catch your breath.
The handmade FRP (Fiberglass Reinforced Polymer) composite shell meets all international safety standards! Enlarged intake and exhaust vents channel airflow through the deeply profiled inner EPS impact liner for maximum cooling.
The built-in Fog-Free Threshold Dropshield sun visor instantly reduces sunlight and glare, while the quick-release outer Threshold Shield, resistant to fogging and optical distortion, provides exceptionally clear vision.
Inside, the comfortable antibacterial Hydradry liner effectively wicks moisture and keeps you feeling dry.
The Threshold was designed from the ground up for asphalt and city roads — exactly where the ICON brand lives and breathes motorcycle culture.
COMPOSITE SHELL
SPORT FIT
MODULAR SYSTEM
EFFECTIVE VENTILATION
OUTER VISOR
BUILT-IN SUN VISOR
COMFORTABLE LINER
EMERGENCY REMOVAL SYSTEM
BLUETOOTH READY
SAFETY
Let’s be honest — motorcycle helmets look great, and you’d like to keep yours looking like new for as long as possible. Over many years of practice we have worked out several effective ways to do this, and we are happy to share them.
We strongly do not recommend using solvents, carburetor cleaner, brake fluid or any other substances in the cans, tins and bottles lying around your garage, including unlabeled ones, to clean your helmet. Chemicals and strong solvents can seriously damage the materials the helmet is made of — please don’t do that to your helmet!
* Never wash or dry the liner in a washing machine or dryer.
Protecting your helmet during long-term storage is definitely a good idea. Keep the helmet in the special bag included. Store it in a safe, dry place out of direct sunlight.
The visor surface must be cleaned very carefully to avoid scratches. Place a clean, warm, damp, soft cloth over the outside of the visor for at least 5 minutes to soften dried bugs and dirt (don’t skip this step!). Then gently clean the visor with a clean soft cloth, warm water and mild soap. After that, wipe the visor with a clean soft cloth dampened with clean water to remove soap residue. Dry the visor by gently wiping it with a clean soft cloth.
Never use solvents, window or glass cleaners, or any other chemical cleaners to clean the visor.
Do not apply decals, tape or stickers to the visor.
If your visor has an anti-scratch or anti-fog coating, keep in mind that household cleaners (such as glass cleaners, all-purpose sprays, furniture polish) can leave unwanted marks and in some cases damage the visor itself.
Do not use any cleaners or detergents on the inside of the visor. Using anything other than a clean soft or microfiber cloth and water to gently wipe the inside of the visor can damage or reduce the effectiveness of the anti-fog coating.
Protect the visor when it is not fitted to the helmet. Store the visor in a dry, safe place, away from direct sunlight and extremely high or low temperatures. Make sure the visor cannot be scratched, damaged by impact or otherwise deformed, is not under heavy objects and is not stored near fuel or solvents. We recommend storing the visor in a soft microfiber bag or pouch.
If your helmet has an internal drop-down visor, be sure to follow the same instructions, as they also apply to the internal drop-down visor.
Although a helmet is hard and has a very strong and reliable construction, it requires careful handling. Dropping a helmet on asphalt or another hard surface can significantly impair its functionality. The user should be aware that an impact may cause damage that is invisible to the eye.
The riding gear manufacturer ICON Motosports warns: when taking part in activities that require a helmet on your head, it is strongly recommended to avoid hitting your head on anything whatsoever. If you suspect reduced helmet functionality, or after ANY impact during use, replace the helmet. We guarantee it will cost less.
No motorcycle helmet in the world can protect against ALL possible impacts. For your safety, you need to choose a helmet that fits correctly. For maximum head protection, the helmet must fit snugly and follow the shape of your skull as closely as possible. To work properly, the helmet must be securely fastened under the chin.
Wrap a flexible measuring tape around your head at its widest point above the eyebrows and ears.
Using this measurement, find your size in the size charts below according to the helmet brand and model:
ICON AIRFLITE / DOMAIN / THRESHOLD
BILTWELL LANE SPLITTER / GRINGO S SV
THOR FLEET / SECTOR 2
| Shell | 2XS | XS | S | M | L | XL | 2XL | 3XL |
|---|---|---|---|---|---|---|---|---|
| Circumference cm | 51–52 | 53–54 | 55–56 | 57–58 | 59–60 | 61–62 | 63–64 | 65–66 |
ICON ULTRAFLITE / AIRFRAME PRO
THOR REFLEX
| Shell | XS | S | M | L | XL | 2XL | 3XL |
|---|---|---|---|---|---|---|---|
| Circumference cm | 54–55 | 55–56 | 57–58 | 58–59 | 60–61 | 62–63 | 64–65 |
ICON AIRFORM
| Shell | XS | S | M | L | XL | 2XL | 3XL |
|---|---|---|---|---|---|---|---|
| Circumference cm | 53–54 | 55–56 | 57–58 | 58–59 | 60–61 | 62–63 | 64–65 |
Skull shape in the horizontal plane is just as important as circumference. To determine your head shape, put on a balaclava (it will flatten your hair) and take a photo of your head from above, or ask someone to assess it. Round head — width and length are almost the same, it fits into a circle. Intermediate oval head — slightly longer than it is wide, the most common skull shape, it fits into a regular oval. Long oval — noticeably longer than it is wide, it fits into a narrow oval.
Different helmet models are made for different skull shapes — keep this in mind when choosing a helmet:
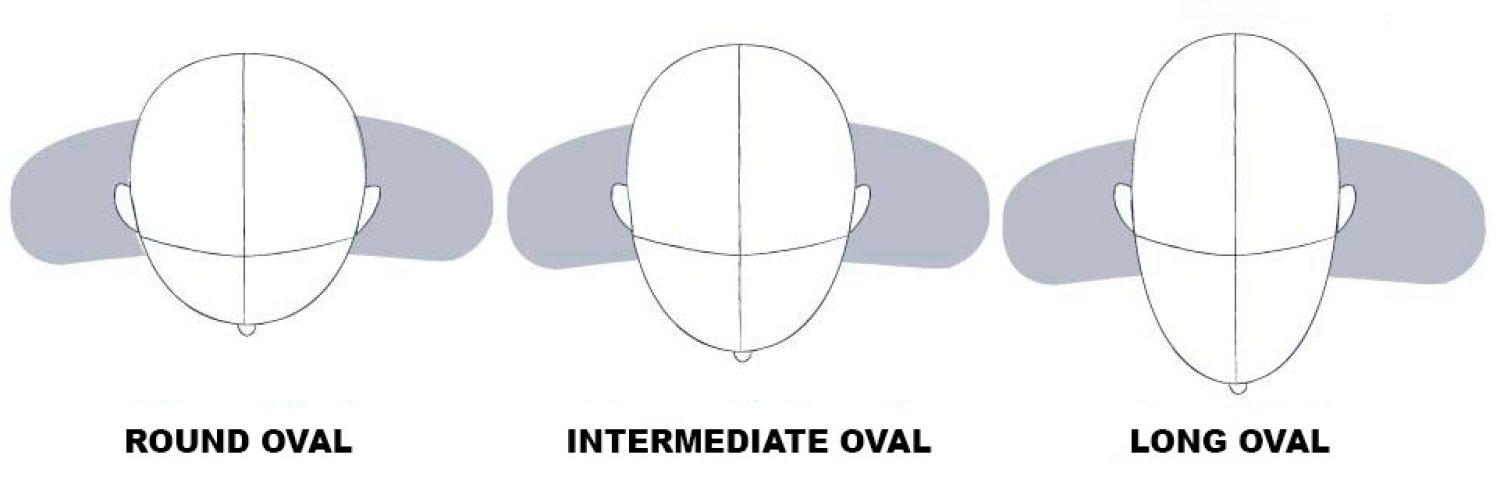

If you can’t determine your head shape (this sometimes happens), it is most likely an intermediate oval, because a round head shape (equal length and width) is the most obvious.
If your head shape doesn’t match the helmet shape, you need to go one or two sizes up, depending on how big the difference in skull oval is. In that case the liner will fit your skull unevenly and not over its whole area, which has a negative effect on impact energy absorption as well as on the helmet’s noise insulation.
NOTE: The helmet’s inner pads compress with use — keep this in mind when trying it on. The helmet should fit snugly and should not press painfully on your skull. The pressure on your cheeks can be quite strong, and they may be squeezed. The cheek pads are the thickest and compress the most.
We don’t believe you need to wear a helmet for a while to get used to it. A helmet chosen correctly by size and shape fits comfortably and snugly right away — proven by hundreds of customers! The only thing that may be uncomfortable is a tight entry when taking the helmet off and putting it on. Over time the pads at the entry will soften, and the helmet will be much easier to put on and take off. Focus on how your head feels inside the helmet!

AX® Materials became known for developing a synthetic leather specifically for gloves that outperformed natural leather in every respect.
The first product was AX® Suede Original, which set the industry standard for comfort, flexibility, high abrasion resistance and tear strength. Since then the range of materials has grown and now includes various types of synthetic leather and mesh textiles, including touchscreen-compatible ones.

Gloves made of AX leather with no damage or significant wear after 122 hours of testing in construction work.
Today AX® materials are used in many products beyond gloves: clothing, workwear, bags, sports equipment of all kinds and riding gear. AX® materials are used by more than 150 brands worldwide (Dakina, Watson, Akta, Mog, Viktos, Loffi, Chromag, Bike Radar and others) to take their gear to a new level of performance.

AX® Materials uses specially structured synthetic polyester fibers to create thin, strong and flexible materials.
These polyester fibers last longer and keep their integrity better than natural suede and leather, while being more breathable and flexible.
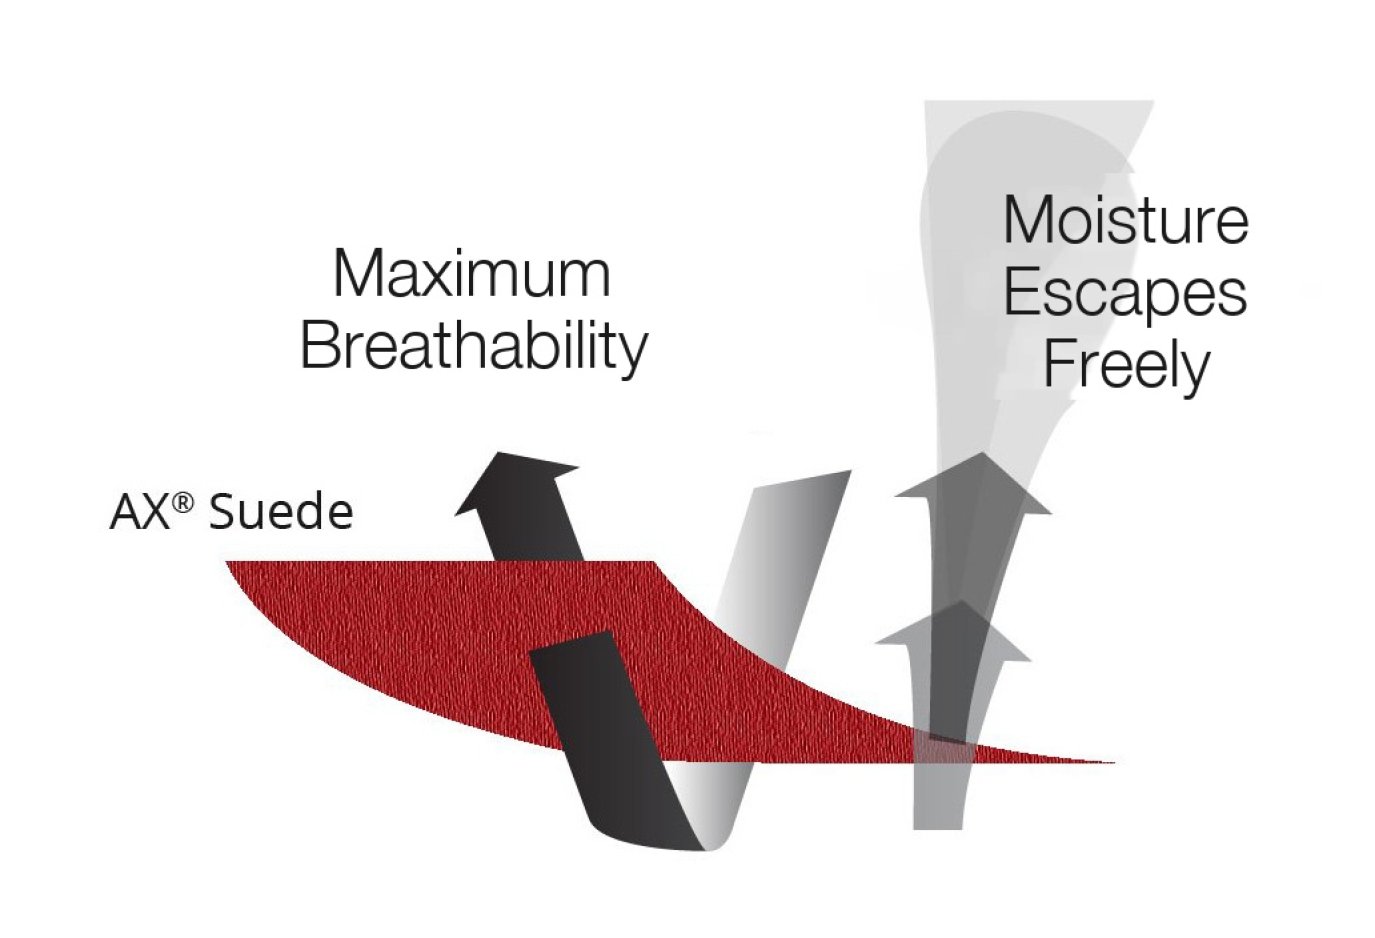
AX® materials are made with knitted polyester with minimal polyurethane content, which provides greater breathability than leather and other glove materials, both synthetic and natural.
This lets heat and sweat escape easily from the glove palm and ensures a secure, grippy, dry hold.

The chart shows a comparison of 0.75 mm Ax Grane Laredo synthetic leather and 1.1 mm cowhide in abrasion resistance and breathability.
AX® products are designed to outperform all other materials and improve performance in use. AX® Materials have proven their effectiveness in various jobs and industries, regardless of conditions. Special high-density yarn combined with other “working fibers” in a complex knitting process creates an optimal balance of strength, softness and flexibility.

The photo shows the wear of 0.8 mm AX synthetic suede after 4,000 cycles of disc abrasion under a 1 kg load. Standard cowhide suede does not last even 1,000 cycles.
Your hands work hard, and a good grip helps reduce the strain. AX® materials have polyurethane and silicone coatings with various textures and embossing, providing superb grip and protection.
AX® materials give your gloved palm a second-skin feel: they don’t slip, they keep sensitivity and they are unnoticeable when bending.
Icon Motosports is among the first to get access to advanced technologies, including AX materials, which are most widely used in motorcycle gloves. Ax Laredo leather glove palms easily pass all certification tests for the USA, Europe and Japan. Almost all the gloves can be used with touchscreens. Some models are made entirely of AX leather or suede.
Icon collections also include motorcycle jackets and vests made partly or entirely of Ax Laredo. As a rule, such models cost not much more but outperform the others in use.

The motorcycle helmet meets the following safety standards:
Before repairing or replacing helmet parts, familiarize yourself with the component names:


Read the entire manual before using the helmet and keep it. It contains information needed for proper use and extending the life of the helmet.
WARNING: motorcycling is dangerous. No helmet can protect the wearer from all possible impacts. Always wear a helmet, eye protection and other riding gear when riding: protective clothing, gloves and footwear. Even when using this helmet, it is impossible to guarantee the prevention of serious injury or death. Take every possible measure to reduce risk. The helmet is not fire-resistant and does not contain fire-retardant materials. The ICON® helmet must fit correctly and be used strictly as intended. Incorrect fit or use may result in serious injury or death.
WARNING: any helmet that has been subjected to an impact must be replaced.
A motorcycle helmet is designed to absorb only one impact. Energy is partly absorbed through irreversible deformation of the shell and the inner energy-absorbing layer. After an impact, the EPS layer may be compressed and damaged even if this is not visible from the outside. After any impact, the helmet’s safe service life is considered over. Such a helmet should be destroyed and replaced, even if it looks undamaged.
Unfasten the chin strap, hold both sides of it and widen the helmet opening. Put the helmet on. If it fits loosely, try a smaller size.
The liner should fit snugly around the head and the cheek pads should press against the cheeks. There should be no gap between the forehead and the liner.
Hold the helmet on both sides and try to move it up and down and from side to side. The liner should pull the skin of your face and head. If the helmet moves freely, it is too big.
Hold the helmet at the front and back and try to roll it forward and backward.

Fasten the strap as tightly as possible without choking. The strap should not sag and should fit snugly under the chin. Try to pull the helmet off forward and backward. If it comes off, it must not be used.
Check the helmet position: it should not sit too high or too low or restrict your view. Your eyes should be roughly in the center of the eyeport.

Check the visor and internal sun shield in all positions to make sure they do not obstruct your view.
Before each use, make sure the helmet is in good condition. Check for loose parts, screws and rivets, strap wear, cracks and other damage. Make sure the liner and cheek pads are correctly installed and the strap fastens properly.
The visor supplied with the helmet meets VESC-8 requirements.
Tinted visors marked “for daytime use only” with the corresponding European sun symbol must not be used at dusk, in darkness, in poor visibility or in adverse weather. Colored visors that interfere with recognizing traffic signals must not be used on public roads. Choose a visor according to the conditions and replace it immediately if it has scratches, cracks, wear or any damage that impairs visibility.
The same requirements apply to the internal drop-down sun shield, Pinlock® inserts and Tear-Off films, if used.
Correct fastening and tightening of the strap are critically important. An incorrectly fastened strap may fail to hold the helmet in a crash.

Important: the snap is only for securing the loose end. It does not replace threading the strap through the D-rings.


Check that the mechanisms work and the visor is clear. Remove dirt, insects and residue that obstruct your view. Scratches, cracks and other damage significantly impair visibility; a damaged visor must be replaced.

The chin bar provides protection only in the fully lowered and locked position.
Do not ride the motorcycle with the chin bar raised and do not move it while riding. Before riding, pull the chin bar up hard several times to make sure it is locked. If it does not lock, stop using the helmet and replace it.


The helmet has an enlarged chin air intake, two adjustable forehead intakes, an upper Supervent intake and a large rear exhaust channel.
Any helmet reduces hearing. Keep this in mind and constantly monitor your surroundings.
Before using a communication system, study the local, regional, national and international requirements for using communication devices while operating a vehicle.
The chin vent opens by pushing the switch up and closes by pushing it down.

The two forehead vents open by pushing the covers up and close by pushing them down.

The top vent opens by pressing its rear part and closes by pressing the front part.


The liner and cheek pads are an important part of the protective construction and must be installed correctly.
The interior lining is made of moisture-wicking HydraDry material. The fit can be changed by installing thinner cheek pads for a looser fit or thicker ones for a snugger fit.

Gently hand wash the removed liner and cheek pads in cold water with baby shampoo. Dry naturally. Do not machine wash or use a tumble dryer.
Emergency removal of the pads and helmet involves a risk of injury and must be performed by qualified emergency personnel.
The injured person’s head must not be moved during the procedure. The head in the helmet must be securely stabilized.


When in use, the curtain must be installed correctly.

Firmly grasp the curtain and pull down. Hand wash in cold water with baby shampoo and air dry. Do not use a washing machine or tumble dryer.
Using a helmet with signs of wear may result in serious injury or death.
A helmet has a limited service life. Replace it when there are noticeable signs of aging or wear: a change in fit, cracks, corrosion, abrasion or fraying of parts.
Manufacturer’s recommendation: replace the helmet no later than 5 years after the date of manufacture shown on the inner liner, even if it has not been subjected to an impact and has no visible damage.
When you buy a new helmet, destroy the old one to prevent reuse. Do not sell or give away your old helmet. Over time, the protective liner takes the shape of the owner’s head and may not provide proper protection for another person.
No personal protective equipment can prevent all injuries in a crash or fall. Motorcycling is inherently dangerous, and using a helmet does not rule out injury or death. Even a low-speed crash can have serious consequences. The user assumes the risks associated with this activity. The provisions of the original manual on waiving claims against Icon® Motosports, Lemans Corporation and Zhejiang Vista Sports Goods Co. Ltd. apply to the extent permitted by the laws of the respective country.


